Dream Animator Instructions
The following description appeared at IGN Pocket, and is (c)1999 snowball.com, Inc.

Because the program is created specifically with the Japanese version of Windows 95/98, most of the menuing system is completely
garbled on other versions of the operating system. But with a little trial and error, you can easily see how the program works.
But for those who can't quite get the grasp of the utility, here's a brief, down-and-dirty tutorial to get you started.

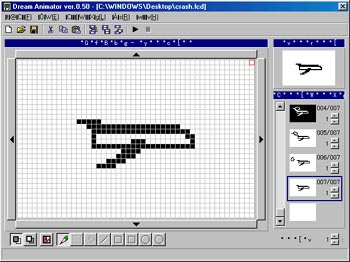
First, you've got your toolbar that will enable you to start a new project, save a project in progress, cut, paste, and let you see your animation in motion.
All these commands are repeated in the taskbar, but since the text is completely garbled, you should use this toolbar to get going.
- New. Click this to start a new project. If a project is already open, you'll be prompted to save your work.
- Open. Use this to open a saved .LCD file.
- Save. Unless you save your work, you'll never be able to distribute it.
- Cut. Currently disabled, this button will let you cut whatever's being surrounded by the Marquee tool (also currently disabled) and put into memory.
- Copy. Currently disabled, this button will copy whatever's being surrounded by the Marquee tool to the memory clipboard.
- Paste. Currently disabled, this button will paste whatever compatible data is in the clipboard onto the current animation window.
- Cut Frame. Hit this button to cut the current animation frame out of your project. The animation frame will still be in clipboard memory.
- Copy Frame. Hit this button to copy the current animation frame into memory.
- Paste Frame. Use this button to paste the frame of animation from memory into your current project. It will be placed before the highlighted frame on the Frame Toolbar.
- Play. This button will start your project animation.
- Stop. This button will stop the animation.

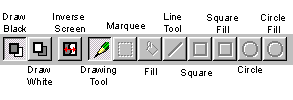
When you're ready to draw, use this toolbar to start painting your screens.
- Draw black. Use this button to start painting black pixels.
- Draw white. Use this button to start painting white pixels.
- Inverse screen. Click this button then all black pixels will turn white, and all white pixels will turn black.
- Drawing tool. With this button pushed, you can draw!
- Marquee tool. Highlight a portion of your screen for editing. Whatever's in the marquee can be cut and copied into memory.
- Circle tool. (Currently disabled) Draw perfect circles.
- Circle Fill tool (Currently disabled) Draw perfect circles filled with the selected color.
- Square tool. (Currently disabled) Draw perfect squares and rectangles.
- Square Fill tool. (Currently disabled) Draw perfect circles filled with the selected color.
 Okay, now that you've drawn your first frame of animation, you'll need another frame to actually make it seem like its moving.
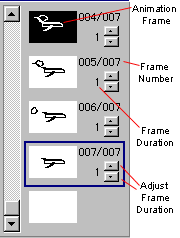
So, you need to use this toolbar. First, either copy a frame of animation and paste it into the current animation, or hit the Insert key to bring up a new frame.
When you highlight this frame, whatever you do will only affect this frame, and not any other part of your animation. Okay, now that you've drawn your first frame of animation, you'll need another frame to actually make it seem like its moving.
So, you need to use this toolbar. First, either copy a frame of animation and paste it into the current animation, or hit the Insert key to bring up a new frame.
When you highlight this frame, whatever you do will only affect this frame, and not any other part of your animation.
If you want a frame of animation to last longer or shorter than others, up the number by clicking on the arrows to increase or decrease its on-screen duration.
|


 Okay, now that you've drawn your first frame of animation, you'll need another frame to actually make it seem like its moving.
So, you need to use this toolbar. First, either copy a frame of animation and paste it into the current animation, or hit the Insert key to bring up a new frame.
When you highlight this frame, whatever you do will only affect this frame, and not any other part of your animation.